Upload Plugin < /code> and locate the zip file on your PC (typically in your web browser download's folder).
/ code>,然后在您的PC上找到zip文件(通常在您的网络浏览器下载文件夹中)。
In case of error due to either restrictive file permissions or WordPress complaining about the plugin already existing, you might need to resort to the previous described method.
如果由于限制性文件权限或WordPress抱怨该插件已存在而导致错误,则您可能需要采用上述方法。
Configuration
配置
Once installed, the first thing to do is to configure the plugin to be able to connect with your Contasimple account.
安装后,首先要做的是将插件配置为能够与您的Contasimple帐户连接。
If you do not have a Contasimple account yet, you can register now by
如果您还没有Contasimple帐户,则可以通过
rel="nofollow">Clicking here.
rel =“ nofollow”>单击此处。
Assuming you are already registered and have configured your fiscal region and company settings, you will be able to generate a Contasimple ‘APIKEY’.
假设您已经注册并配置了您的财务地区和公司设置,则可以生成Contasimple的“ APIKEY”。
This key is unique to you and will grant your WooCommerce access to Contasimple’s servers so that the sync process can happen.
该密钥对您来说是唯一的,它将使您的WooCommerce可以访问Contasimple的服务器,从而可以进行同步过程。
Step 1
步骤1
To generate the APIKEY, you must log first into your account at Contasimple Website and then click on the Settings
要生成APIKEY,您必须首先登录 Contasimple网站进入您的帐户,然后单击“设置”
icon wheel on the top bar, locate the sidebar menu and scroll down to the Other options section and click External Applications.
顶部栏中的图标滚轮,找到侧边栏菜单,然后向下滚动到 Other options 部分,然后单击 External Applications 。When the new section is loaded, scroll down to the bottom and you will see a Authorization keys section.
加载新部分后,向下滚动到底部,您将看到一个授权密钥部分。Click on “+ Add authorization keyand chooseWooCommerce`.
点击“ +添加授权密钥,然后选择 WooCommerce`。A new key will be generated, which will look like a long sequence of random characters, something like ‘fcc6360446b04f199b715c58a9116957’.
将生成一个新密钥,该密钥看起来像一长串随机字符,类似于“ fcc6360446b04f199b715c58a9116957”。
Select the key (but not the quote marks) with the help of the mouse and copy/paste it.
在鼠标的帮助下选择键(而不是引号),然后将其复制/粘贴。
You will need it during the next step.
您将在下一步中使用它。
Step 2
步骤2
Now that we have generated the APIKEY, we need to configure the plugin to use it.
现在我们已经生成了APIKEY,我们需要配置插件以使用它。
All Contasimple’s plugin settings are handled by WooCommerce, since this is an integration for it.
Contasimple的所有插件设置均由WooCommerce处理,因为这是它的集成。
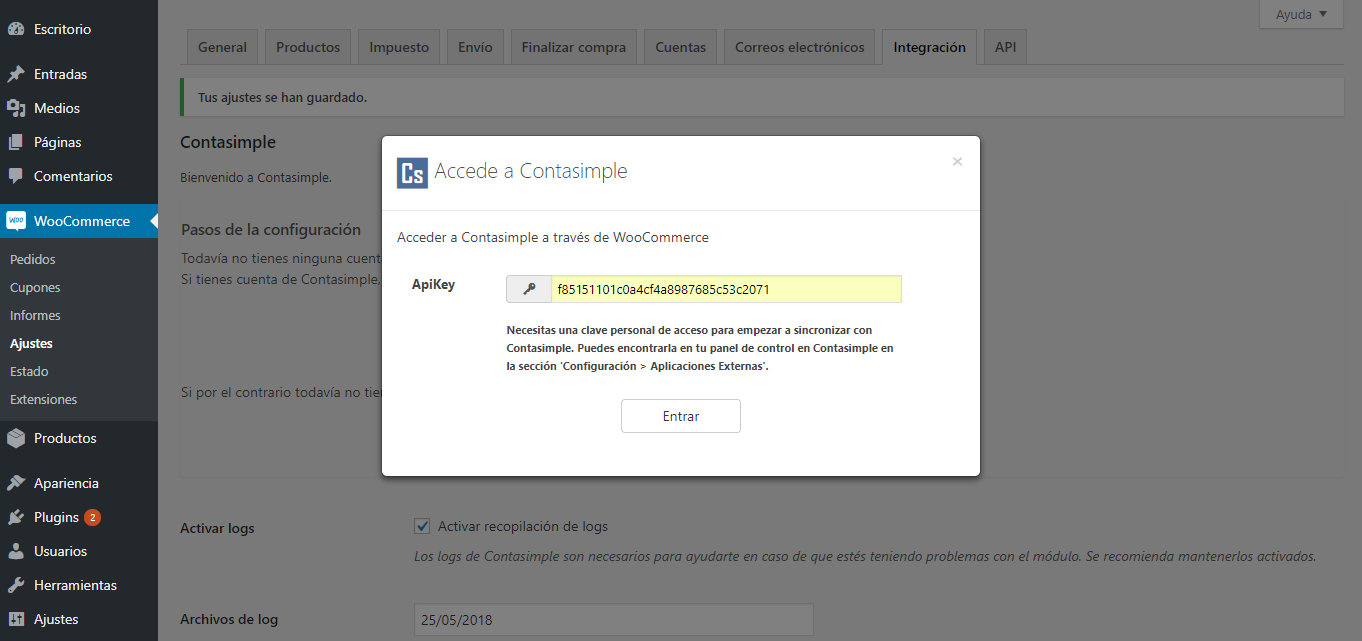
Therefore, you must navigate to WooCommerce > Settings and head to the Integration tab.
因此,您必须导航到 WooCommerce>设置,然后转到 Integration 标签。Since this is your first time using the plugin, you will be presented with the Configuration Wizard.
由于这是您第一次使用该插件,因此将向您显示“配置向导”。
Click on the Link account button.
点击链接帐户按钮。The first step will ask you for the previous generated APIKEY, paste the value on the text field and click Log In.
第一步将询问您先前生成的APIKEY,将值粘贴到文本字段中,然后单击 Login 。You should see a success message and then you will be presented with a dialog to choose between your companies (just in case that you manage more than one) and you can also configure the correspondence between WooCommerce payment methods and Contasimple’s.
您应该会看到一条成功消息,然后会看到一个对话框,供您在公司之间进行选择(以防您管理多个公司),还可以配置WooCommerce付款方式和Contasimple付款方式之间的对应关系。
Congratulations!
恭喜!
You have already configured the basics of the module.
您已经配置了模块的基础知识。
You can now start syncing your invoices.
现在,您可以开始同步发票了。
For more detailed info about additional configuration settings, please see the FAQ section.
有关其他配置设置的更多详细信息,请参阅“常见问题”部分。